
You've found a room that looks big enough, chosen a simulator and pencilled in a build date. Then someone asks which socket it'll use, whether the frame fits through the service door and who signs off the installation. Those questions need answers before the equipment arrives, not while the installer is unpacking it.
A reliable golf simulator installation starts with a measured layout, an agreed power and cable plan, and a clear testing responsibility. Whether you're preparing an exhibition stand, a club practice room or a home garage, fix those decisions before the first bracket goes up.
Room Size and Clearance You Need Before You Start
Minimum room size by launch monitor setup
| Setup | Width | Clear height | Depth |
|---|---|---|---|
| Camera-based launch monitor, player facing screen | 3.0 m | 2.8 m | 4.5 m |
| Radar launch monitor behind the player | 3.0 m | 2.8 m | 5.0 m |
These dimensions are practical planning benchmarks from GolfBays' launch-monitor guidance, allowing approximately 3.0 m width, 2.8 m clear height and 4.5 m depth for a camera-based layout, with depth increasing to about 5.0 m for radar behind the player. They're not universal legal minima or a guarantee that a particular model will fit. Recheck the selected hardware's geometry before committing to the room.
The expensive mistake is measuring only the screen footprint. A screen can fit neatly against a wall while the golfer's driver catches a beam, or the radar lacks the tracking space it needs.
Measure the usable room, not the brochure dimensions
Use a laser measure, tape measure and marked floor plan. Measure to the lowest obstruction, including beams, suspended lights, pipework and garage-door mechanisms, rather than recording floor-to-ceiling height.
Check the delivery route too. Door widths, turns, stairs and lifts can determine whether a screen frame reaches the room at all. Confirm floor loading for heavier equipment with the venue or building owner, rather than assuming a raised floor will accept it.
Mark the hitting position and check both the backswing and follow-through. Reserve a separate spectator area outside that swing envelope, with a route that doesn't invite visitors to walk behind an active player. For a temporary layout, use the mobile golf simulator planning information alongside the venue drawing.
Make the build sequence explicit
- Survey and record. Capture the usable envelope, access route, floor loading, ceiling obstructions, audience circulation, supply capacity and socket positions.
- Compare the room with the chosen hardware's requirements and make the go or no-go decision.
- Prepare the physical bay. Level the floor, mark the mat and fix the screen frame only after the electrical route and testing responsibilities are agreed.
- Have a competent electrician install the agreed supply and cable infrastructure.
- Mount the projector and launch monitor, then complete the equipment connections.
- Commission before use. Calibrate and run a supervised test.
Go or no-go rule: Proceed only when the chosen monitor fits and a full driver swing clears every obstruction with a sensible margin. A player having to shorten their swing is a failed layout, not a workaround.
Preparing the Floor and Mounting the Screen
Start with the floor, not the frame. A rocking mat or uneven base changes the player's stance and makes it harder to establish a reliable relationship between the ball, screen and sensor.
Use a spirit level or laser level across the proposed mat and frame positions. Check the substrate beneath carpet or temporary flooring, because a surface can look flat while compressing under the player's feet.
Build from a stable base
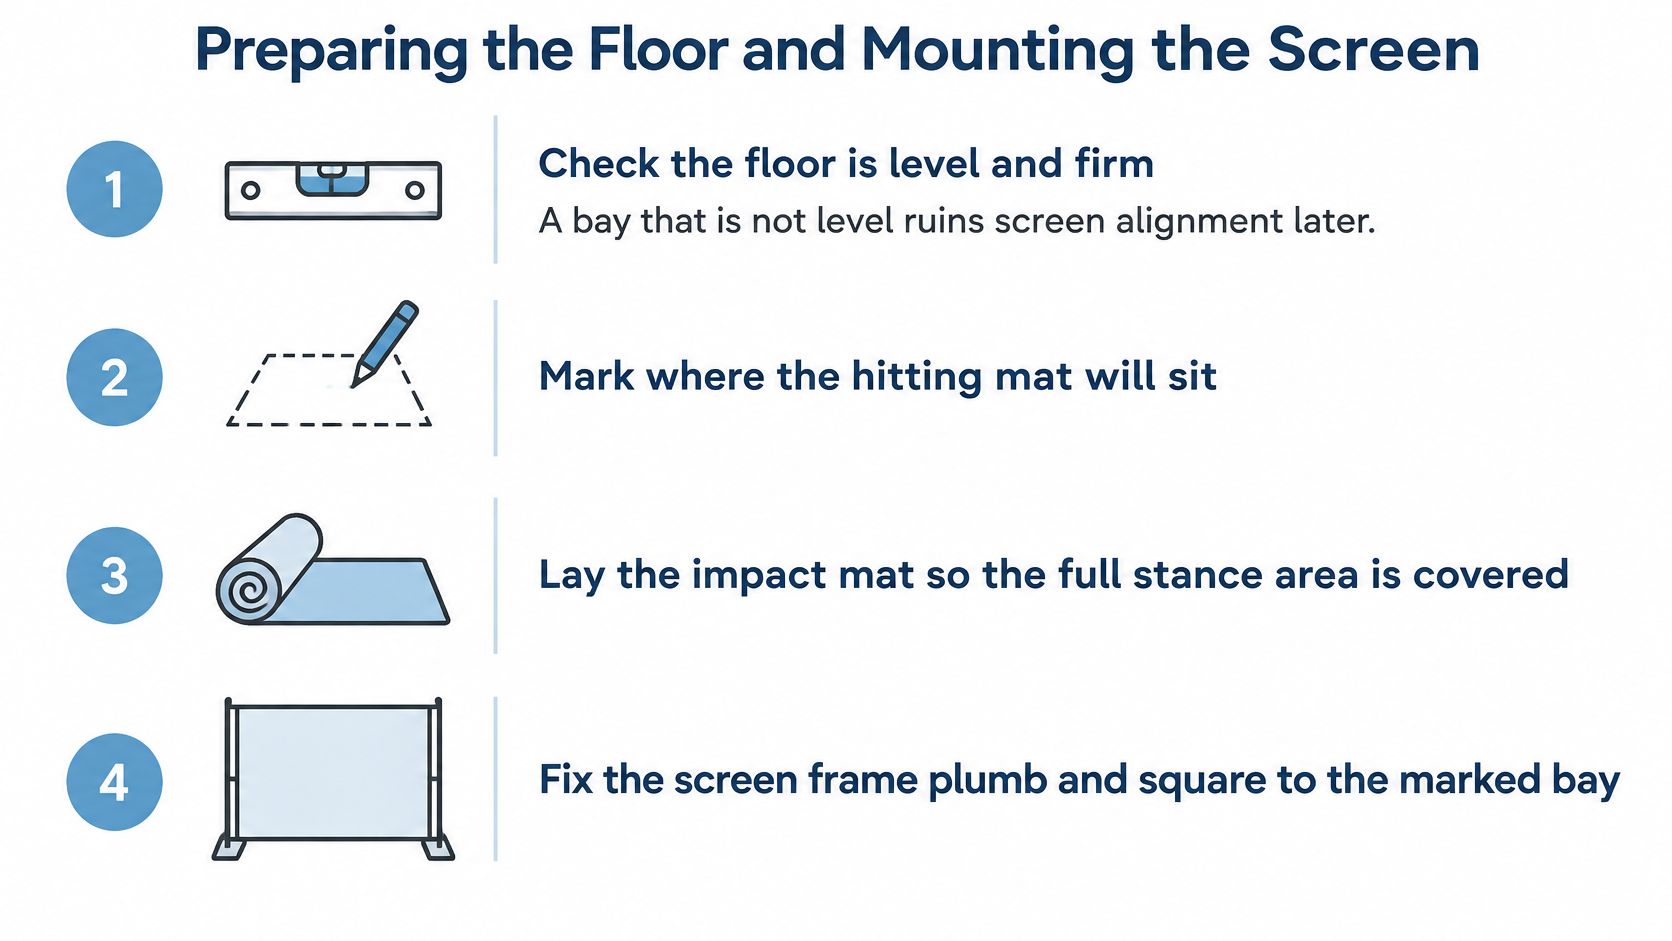
Check that the floor is level and firm. Identify movement, soft patches and changes in level before laying the bay surface. Use a suitable stable levelling system rather than loose packing that can shift during play.
Mark where the hitting mat will sit, including the stance area and intended ball position. This gives the frame installer a fixed reference instead of leaving the golfer's position to whatever space remains.
Lay the impact mat and check the swing envelope. The player's stance should feel stable, with the full swing and follow-through clear of the enclosure. Secure edges so they can't curl into an approach route.
Set out and anchor the screen frame according to the manufacturer's instructions, using fixings appropriate to the substrate. Check it is plumb and square before tightening everything, and keep the impact zone away from visitors and walkways.
Fit the screen evenly. Remove sag and wrinkles without overtensioning the material, following the screen manufacturer's tension and rear-clearance instructions. A flat-looking screen still needs room to absorb impact safely.
Check the frame before dressing the room
Fixing the frame before levelling the floor makes every subsequent adjustment harder. You can end up compensating with uneven screen tension or projector correction when the underlying problem is a frame that wasn't square to begin with.
Don't drill into a wall or floor until the fixing positions have been checked for concealed services. In a hired venue, obtain permission for the proposed fixing method; a freestanding enclosure still needs the manufacturer's specified stability arrangements.
Keep light fittings away from the screen face and plan dimmable room lighting. The hitting area needs usable illumination, but broad light spilling across the impact screen will weaken the projected image.
Before mounting the electronics, check:
- Mat level: No rocking, creeping or raised edges.
- Frame square: Uprights, crossmembers and diagonals agree.
- Screen flat: Even tension without excessive tightness.
- Clearances confirmed: Nothing intrudes into the tested swing envelope.
- Fixings secure: No loose anchors, brackets or exposed ends.
Electrical Supply, Networking and Cable Routing
A nearby socket isn't an electrical plan. The electrician needs the equipment inventory, load information and proposed locations before deciding how to supply the bay. Include the projector, PC, launch monitor, lighting, network equipment and any ancillary devices that will run together.
Hastings Borough Council's event guidance calls for installation by a suitably competent electrician, written sign-off after completion and temporary-supply RCD protection with a maximum tripping-current rating of 30 mA. It also requires correctly rated cables, protection against unauthorised interference and safe equipment suitable for its environment.
Supply first, connectivity second
Document the available supply. Record capacity, socket locations, isolation arrangements and who maintains the installation. Give the electrician the equipment ratings, not a guess based on the number of plugs.
Have the electrician provide an appropriately designed supply for the complete simulator. Plan it separately from event lighting and AV so another contractor can't casually add loads to the same arrangement.
Confirm RCD protection and isolation. The electrician should select and verify the protection, label the isolator and leave it reachable in an emergency. Installing or modifying mains wiring isn't a task for the simulator operator or a general stand builder.
Establish the network connection before closing cable routes. Keep the PC and network switch accessible, confirm venue login restrictions, and use wired Ethernet where practical.
Complete the signal runs. Keep HDMI runs short where possible; use a compatible active cable or signal extender where the required distance exceeds the approved passive arrangement. Check the launch monitor's USB or network requirements before substituting cables.
Route cables for people as well as equipment
Design routes around the perimeter, away from doors, walking routes and vehicle movements. Hastings' guidance says cables must not pass through door openings or across walkways and roadways, so don't assume a cable ramp automatically makes a prohibited route acceptable.
Where the venue's approved design permits an unavoidable crossing, use suitable protection and confirm it with the responsible electrical contractor. Don't coil spare cable in a way that creates heat or mechanical hazards, and don't bury connectors where nobody can inspect them.
Guard electrical equipment against interference and keep ventilation openings clear. Include suitable fire-extinguisher provision in the venue arrangements rather than leaving it until opening.
Handover requirement: Put the electrical certificate and wiring plan in the installation file before anyone uses the simulator.
For a permanent room at home or a club, ask a registered electrician to install a dedicated circuit and provide a signed installation certificate before switch-on. Use the installation requirements checklist to coordinate the room, supply and access information before work starts.
Positioning the Projector and Launch Monitor
The manufacturer's geometry governs the installation. Don't position the launch monitor wherever it looks tidy and then try to compensate in software. Establish the ball position, sensor relationship and projector throw on the drawing before drilling mounting holes.
The projector and launch monitor also need different checks. A projector can produce an attractive image while the sensor is misaligned, and a sensor can capture shots accurately while the player casts a shadow across the screen.
Establish the optical positions
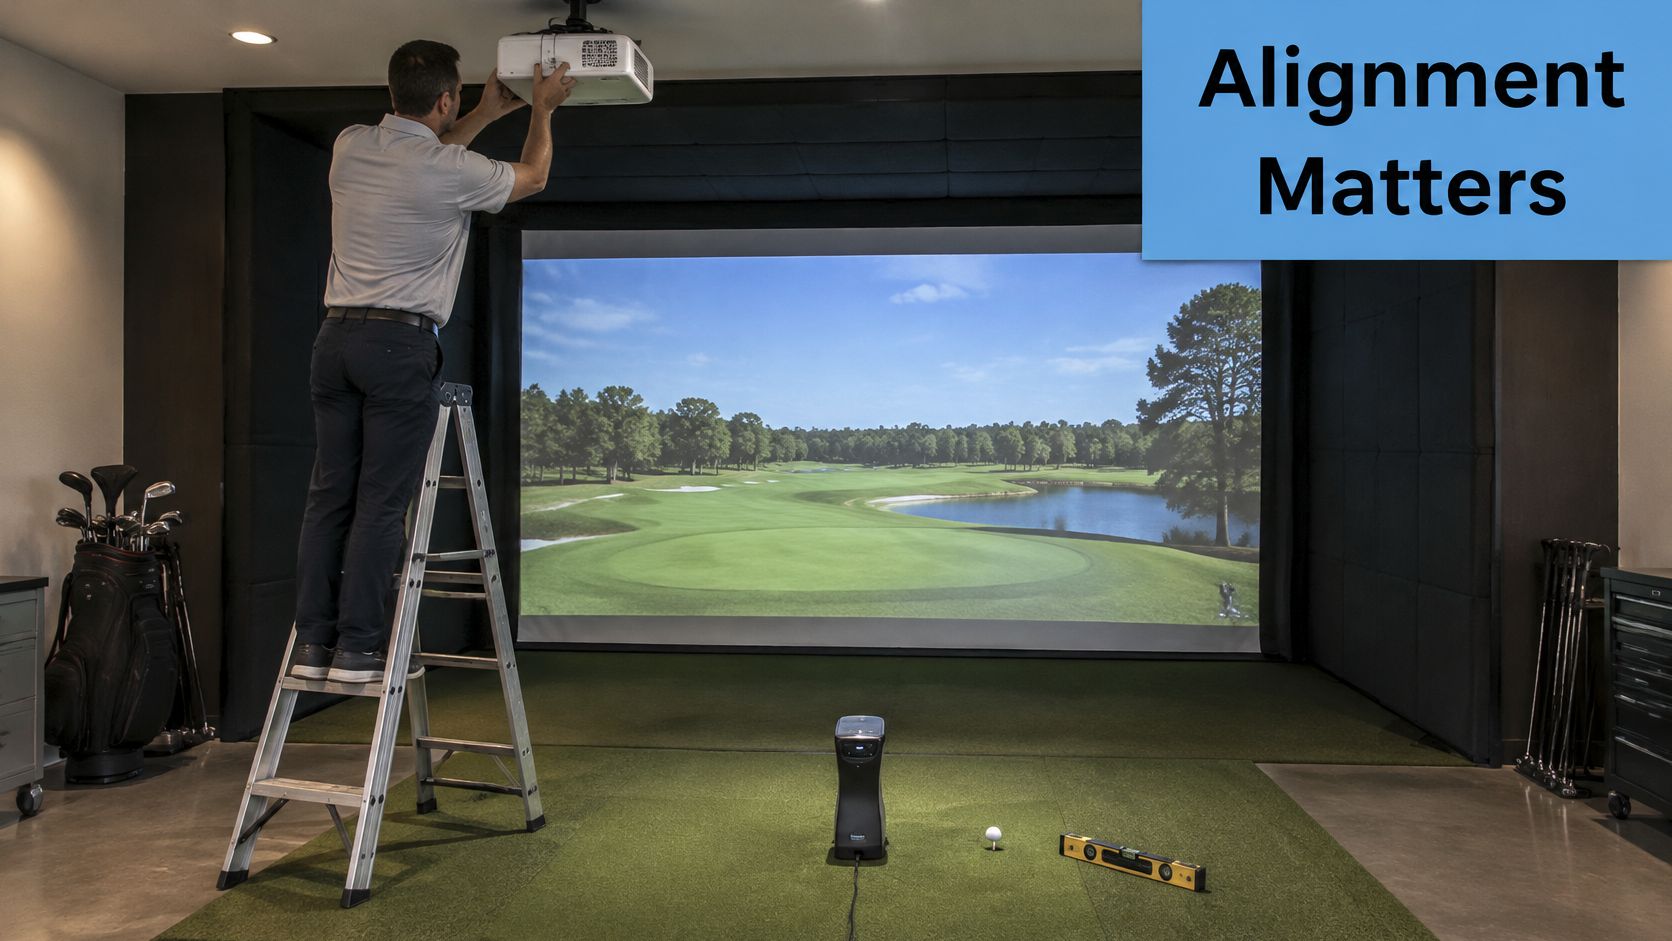
Mount the projector to its specified throw distance and height. Centre it appropriately on the screen and use a fixing point that can safely support the mount. Check the proposed position against the golfer's club path before installation.
Physically square the projector, then use keystone correction where necessary to finish the rectangular image. Don't rely on extreme digital correction to rescue a badly positioned mount, and tighten the mount only after alignment is satisfactory.
Place the launch monitor using its specified ball and sensor geometry. Camera units need the correct ball location, distance and angle; radar units need the specified relationship to the line of flight. Measure from the reference points identified in the equipment manual.
Check that neither the club nor an errant ball can strike the sensor. Any protective housing must be suitable for the device and mustn't obstruct its view.
Power up and verify recognition. Confirm that the software sees the launch monitor and identifies the intended ball position before beginning shot testing.
Catch movement and access problems early
A projector shelf attached to a structure that moves with ball impacts can produce a shifting image. Use a rigid mounting arrangement, keep the projector ventilated and provide cable strain relief so a tug on a lead doesn't alter its aim.
Don't put a rear-mounted radar unit against the spectator line. Visitors need a defined viewing area that doesn't double as sensor space, and staff need access to the equipment without stepping into an active bay.
Test left- and right-handed play if both are expected. A floor-mounted camera device may require repositioning between players, while an overhead arrangement still needs adequate swing clearance on both sides.
For a practical acceptance check, make the first test shot appear in the correct screen position, then run ten or more shots while watching for movement in the projector and sensor. That's a recommended commissioning exercise, not a manufacturer-independent accuracy standard.
A successful shot isn't enough. The equipment must stay in position when the player changes, the ball is replaced and the bay runs repeatedly.
Keep adjustment tools available until this check is complete. Don't conceal brackets or close decorative panels before you know the mounting arrangement holds its alignment.
Calibrating, Testing and Fixing Faults
Calibration needs the finished operating environment. Work lights, open loading doors, unfinished flooring and temporary projector positions can produce a setup that behaves differently once the venue is dressed and the audience arrives.
Electrical acceptance and simulator calibration are separate tasks. A working projected image doesn't prove the supply is safe, and an electrical certificate doesn't prove the launch monitor captures shots properly.
Richmond's guidance on BS 7909 explains that temporary event electrical systems fall within a framework requiring competent design and installation, with testing completed before handover and results recorded. This applies to the complete temporary system, including distribution and connected equipment, rather than just individual appliances.
Run a repeatable commissioning session
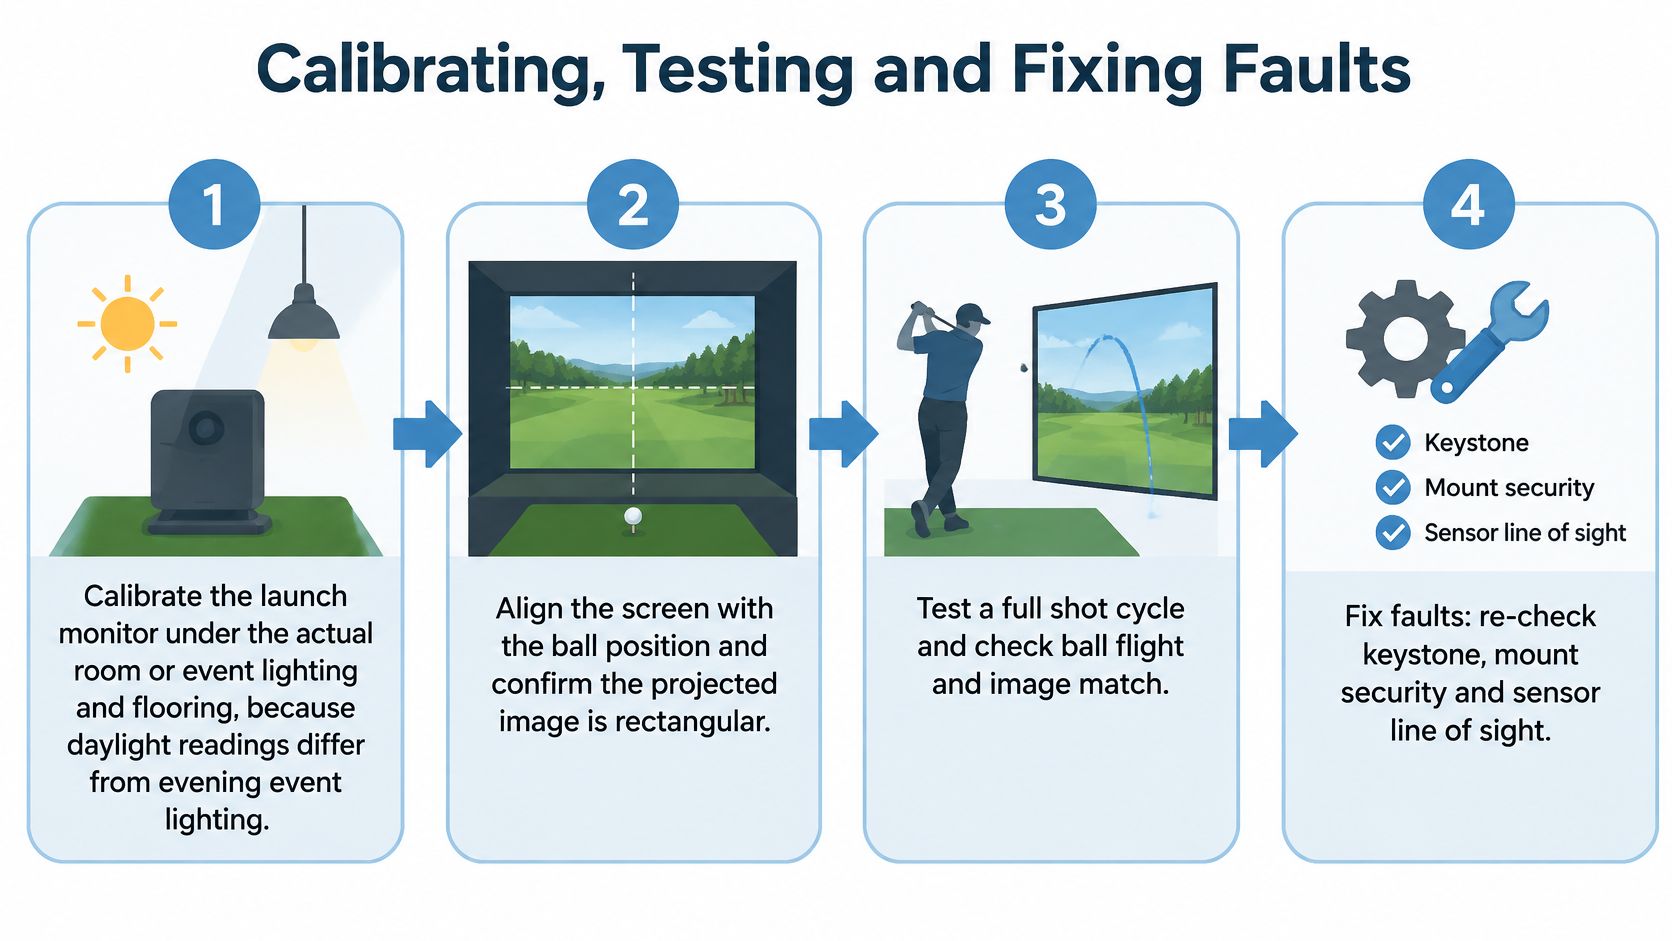
Calibrate under the actual lighting and flooring conditions. Set the lighting to its operating state, close or shade windows as intended, and complete the manufacturer's calibration procedure. Daylight setup conditions may differ from evening event conditions, so don't treat an earlier calibration as automatically valid.
Align the displayed target with the intended ball position, then hit a controlled set of shots. Check that the projected reference and the physical hitting line agree, rather than judging alignment by whether the image fills the screen.
Exercise different shot types. Include left and right shot directions, short and long shots, and at least one high and one low shot as a practical test routine. Where different-handed players will use the bay, include them in the supervised check.
As a commissioning recommendation, test consistency across ten to twenty shots. Record missed detections, unexplained flight results and interruptions rather than selecting only the shots that look convincing.
Run a supervised operating session. Have a staff member manage the player approach, shot cycle, score display and exit. Record results and faults, retain the records, and give the crew a short written handover summary.
Diagnose before changing settings
Use the symptom to choose the first check, not to declare a diagnosis. For example, a PC cut-out may involve supply protection, overheating or a device fault, so don't repeatedly reset protection and continue operating.
The following table gives the initial fault-to-fix path. Treat each change as something to verify, not proof that the underlying problem has disappeared.
Installation faults, causes and fixes
| Symptom | Likely cause | Fix |
|---|---|---|
| Missed or unreadable shots | Radar unit outside the line of flight | Reposition to the manufacturer geometry and retest |
| Distorted or trapezoid image | Projector not squared before locking | Correct keystone and re-level the mount |
| Washed-out screen | Stray light or a fitting too close to the screen | Move or dim the light and shade windows |
| Projector or PC cuts out | Shared or unprotected circuit | Move to a dedicated RCD-protected supply through an electrician |
| Ball flight does not match the strike | Calibration done under different lighting | Recalibrate under the final event lighting |
| Club contact near the screen edge | Insufficient clear height or depth | Increase clearance or move the mat and retest |
A club-contact incident means stop play immediately. Don't let another player try the same arrangement while someone decides whether the contact was unusual.
Likewise, isolate and label defective electrical equipment. Anything involving the supply, protective devices or mains connections goes to the competent electrician, not to a staff member experimenting with extension leads.
Make the test record useful
A useful record allows someone else to understand what was tested and what remains unresolved. Include the equipment identity, software configuration, test conditions, operator, results and any restrictions on use.
- Electrical evidence: Retain the relevant installation certificate and test documentation.
- Simulator results: Note shot capture, image alignment, operating interruptions and the conditions under which testing took place.
- Change history: Record what moved or changed, who authorised it and what was retested.
- Operating responsibility: Name who can open the bay, stop play and authorise a return to service.
Quick operational adjustments can sometimes be completed on the day, but they still need a proportionate check. Changes to the mat, sensor, projector or lighting can affect more than the single fault being addressed.
Log every post-commissioning change and retest before the next public session. Keep electrical testing with the electrical contractor and shot-performance checks with the simulator operator, with both records in the same handover file.
Finally, rehearse an interruption. Staff should know how to stop entry, secure the club, keep guests outside the bay and contact technical support without leaving the attraction unattended.
Final Venue Check and Next Step
Don't approve the booking on floor area alone. Before committing money or a date, compare the proposed installation with the actual room survey and get the unresolved points into writing.
A supplier who can assemble quickly isn't necessarily the supplier who will pass venue acceptance smoothly. Competent installation, a written risk assessment and evidence of testing are more useful buying criteria than an optimistic setup promise, particularly where a venue must approve temporary equipment and electrical arrangements. HSE's event electrical-safety guidance makes proper selection, installation, maintenance and public protection central to the organiser's responsibilities.
Approve the complete installation
- Room acceptance: Confirm the chosen launch monitor fits, with unobstructed height, depth and a full driver swing.
- Power approval: Agree the supply, cable route, protective arrangements and isolation with the venue or property owner.
- Delivery access: Confirm the frame's route into the room and who provides handling assistance.
- Environmental suitability: Check any room or marquee for the equipment's footprint, height clearance and weatherproofing.
- Document ownership: Name who receives and retains the test records and handover file.
For our installations, the client must arrange any help needed to access or leave the venue. Rooms and marquees must also be large enough for the equipment's footprint and height clearance, with appropriate weatherproofing.
We can supply, install and test golf simulators with our team for event hire. Our wider simulator hire range covers American Football, Baseball, Basketball, Boxing, Cricket, Cycling, Football, Golf, Ice Hockey, Rowing, Rugby and Shooting, which can help when planning a mixed-sport activation.
Use the golf simulator pricing enquiry to provide a complete installation outline, rather than requesting a price against an unknown room. Send the measured dimensions, photographs, power details, access information and event format, then request a written installation plan before agreeing a date.
PSW Events offers golf simulator hire with planning, delivery, installation and on-site operation for events. Visit PSW Events with your room dimensions, power details and intended event format so we can discuss a suitable installation and the venue information needed before booking.